
Introduction
Believe it or not, night-time photography is easy. However there are a few simple things to bear in mind when attempting to create a photograph under such conditions. Entire books have been written about night photography itself, let alone the techniques of composition and art in photography. Although simplified to maintain brevity, it is hoped that this tutorial will cover some of the basics to inspire you to dive into night photography, yet also contain enough information to help you grow as a photographer.
Why Night Photography?
A chaotic scene by day transforms into a laid-back environment as night falls. The streets come alive with lights and colors of various shades, creating many charming details and points of interest. It is the dazzling nature of these artificial lights and their contrast with the darkening sky that draws the human eye. Quite literally, night photography is the act of “painting” a picture using light alone.
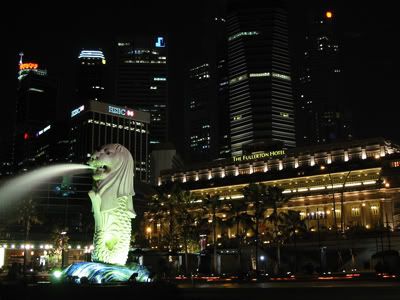
Figure 1: Shutter Speed- 3.2 seconds, Aperture Value- f/9
Night photography uses light to “paint” a picture.
What Else Separates Night From Day-time Photography?
Light is of paramount importance in photography. The sun is a powerful light source, and we are able to see the objects around us because they reflect light. The camera needs the light bouncing off these objects to create the final image. Put simply, photography is really the art of capturing light in a creative way.
But lighting becomes deficient at night, with street lamps, light bulbs and spotlights becoming primary light sources. The key to successful night photography is knowing how to adjust your camera settings to compensate for low-light situations.
Often, people spot a beautiful night scene that makes a worthy capture. They enthusiastically whip out their cameras, level it and fire away, but produce disappointing pictures such as the one below. Figure 2 is an example of an image that is underexposed. It is too dark.
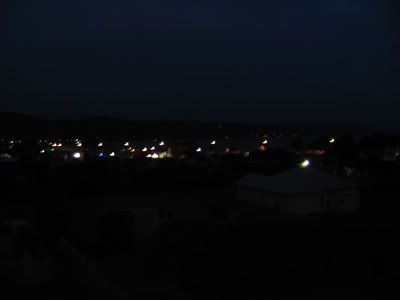
Figure 2: Shutter Speed- 1 second, Aperture Value- f/2.8
This photograph is underexposed (too dark).
The next obvious option is to utilize the flash. Unfortunately most camera on-board flashes carry very little strength beyond two or three meters, and even more powerful external flashes cannot illuminate distant objects. Figure 3 is a good example of how light from a flash rapidly drops off after a short distance. This causes nearby objects to be overexposed (too bright), while those further away still remain underexposed.

Figure 3: Shutter Speed- 1/60 second, Aperture Value- f/2.8
A flash loses effectiveness quickly over even short distances.
If you wish to attempt night photography, the bare essentials are:
-a camera with a Manual Mode that allows you to set Shutter Speed and Aperture Values, an Aperture Priority mode supported by a good range of long shutter speeds, or at least a Night Scene Mode and preferably also a self-timer function
-a decent-sized memory card with one spare in the bag
-a spare set of batteries
-a bean bag loosely filled with plastic or foam beads
A tripod is highly recommended as a means of supporting your camera. In the past I utilized all kinds of support including handrails, lamp posts and rubbish bins, but this also meant that I had to miss a shot if I could not find a stable structure nearby. Tripods give a photographer the freedom to explore different perspectives, to be flexible with their exposure factors, and they can act as a useful deterrent in the seedy parts of town.
It is important to stress that when it comes to tripods, size matters. While even the small pocket-sized ones are useful for compact camera users, larger ones are more stable, often more functional, and allow the camera to be elevated to a greater height. But size and stability comes at a price: a hefty weight penalty. This is especially true of tripods that are constructed of aluminium. Carbon fibre tripods are considerably lighter, but they are also more expensive.
When shopping for a tripod, take your camera with you to the store so that you can mount it onto various tripods for a test. Look for a tripod that will place the mounted camera's viewfinder at roughly eye-level when all its legs are fully extended, but without extension of its center column. Doing the latter reduces the stability of your entire setup because your camera is now effectively mounted on a monopod that's connected to a tripod.
If you want a well-balanced tripod for a variety of purposes, look for one that can also go low, and does so easily. This is especially useful if you want to shoot from a low viewpoint, do macro work or photograph small subjects at their eye-level. Avoid a tripod if its construction means that you'll need to mount the camera upside-down and photograph from between its legs.
Tripod heads can be broadly classified into two categories. Pan heads (or three-way pan heads) allow you to make more precise adjustments to your composition and these are excellent for the purposes of landscape and architectural photography.
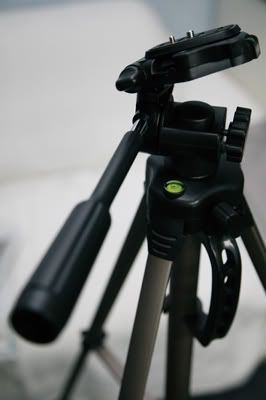
Figure 4: A three-way pan head.
Ball heads are much more fluid and speedy to use but are generally less precise. They are preferred for sports and wildlife photography. Nevertheless, either of these tripod heads can be used for night photography.

Figure 5: A simple ball-head.
Further reading is necessary in order to glean more information about tripods. This topic is out of the scope of this tutorial because for the most part, even the simplest tripods will suffice for night photography. The type of tripod you need will also vary according to the camera setup you use.
The tripod I use is the aluminium Manfrotto 055Pro/ Bogen 3021 with a 488RC2 ball head. It is a sturdy and functional tripod setup that can be had for not much money but it's also very weighty at 3kg. With that out of the way, let's move on to some camera basics now.
What’s In a Lens?
The lens is the eye of the camera, and determines what it ‘sees’, just as our eye affects how we view the world around us. In order to produce high quality images, a digital camera must have a good sensor, image processor and be coupled to a quality lens.
Most cameras can be separated into two broad categories, regardless of whether they are film-based or digital:
-compact cameras: the lens on the camera is permanently attached and cannot be changed
-single-lens reflex (SLR) cameras: the lens can be replaced with another that is more suited for the intended purpose
Take a glance at the tip of your camera lens, and you will probably notice a line of figures and letters printed in the following manner:
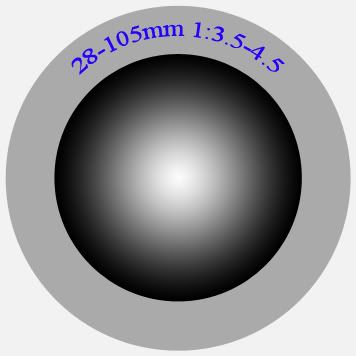
Figure 6: Anatomy of the exterior of a lens.
The digits ‘28-105’ represent the focal length range. This means that 28mm is the shortest focal length of the lens and 105mm is the longest. Using a short focal length allows wider coverage of a scene, hence this achieves a wide-angle view. ‘Zooming in’ on an object or using a longer focal length results in a narrow angle of view.
Lenses that are capable of short focal lengths are called wide-angle lenses, and those that possess long focal lengths are termed telephoto lenses. Wide-angle lenses distort perspective by making things look further apart than they really are, giving the impression of great distance and space. Nearer objects appear disproportionately larger.
On the other hand, telephoto lenses ‘compress’ the perspective to make objects appear closer to each other. This flattening of perspective is often desireable for portrait photography because it smooths out facial features.
Some lenses cover a huge range between a short and long focal length (eg. 18-200mm, 28-300mm), and these are casually called ‘all-in-one’ lenses. Though they are great for travelling, their construction compromises on optical quality, particularly towards the shortest and longest end.
The next set of numbers, ‘3.5-4.5’ shows the widest possible aperture at the wide and telephoto end of the lens. The aperture is a ‘hole’ in the lens that allows light to enter and hit the film or camera sensor. Just like the pupil of the human eye, the lens aperture can be opened wider or made smaller by adjusting the settings in the camera. In this example, the widest possible aperture at a focal length of 28mm is f/3.5, and the aperture gets gradually smaller as the lens is zoomed. At the 105mm end the maximum aperture is f/4.5.
The Loving Relationship Between Light and Camera…
The amount of light entering the lens of your camera and hitting the film (in the case of traditional film cameras) or the sensor (in digital cameras) is regulated by Shutter Speed and the Aperture setting. A third factor is the ISO rating. These are the things that determine whether your resulting image is correctly exposed.
To better understand these factors, let’s use the 'sinking-ship' analogy. Imagine that there is a defect in the hull of a ship out at sea. It is taking in water and gradually sinking to the bottom of the ocean. Think of Shutter Speed as the length of time the defect remains unfixed. And imagine that the Aperture setting is the size of the defect.
Shutter Speed (or Exposure Time)
If the defect is not repaired for an extended period of time, more water will enter the ship. In the same manner, keeping the shutter blades open for a longer period allows more light to enter the camera, thus resulting in a brighter image.
The available choices for exposure time vary greatly across the board, and there can be big differences even between cameras in the same class. For example, my first digital compact camera allows for several choices between 1/1500th of a second (or 1/1500s) up to 15 seconds for dimly-lit scenes. But more expensive cameras feature a greater range of choices and sometimes a Bulb mode that allows the shutter blades to remain open for as long as the shutter release button is held down.
Shutter Speed and Motion Blur
An increased exposure time may allow for a brighter image and reveal intriguing details in a scene, but it has its repercussions. Problems such as camera shake (movement of the photographer or the camera itself and unintended motion blur (from the objects within the scene) become more significant at longer shutter speeds.

Figure 7: Shutter Speed- 4 seconds, Aperture Value- f/4.8
Motion blur- Spirits, ghosts or people in motion?
This is why sports or action photography usually requires a fast shutter speed and hence faster lenses to “freeze” action and prevent motion blur. A good way to reduce camera shake in night photography is with the use of a tripod, or any other support that is stable and well-isolated from sources of vibration. Unfortunately camera shake is also created when the shutter release button is pressed to capture an image. The latter problem is avoided if you use a remote shutter release or the self-timer function. It is also recommended that SLR users engage the mirror lockup facility if it is available on their camera.
Do remember that more extreme forms of camera shake or motion blur can also be used to produce creative images, and may portray a degree of action in itself.
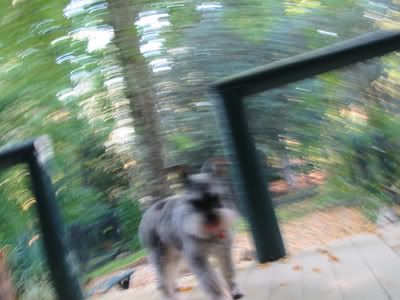
Figure 8: Shutter Speed- 1/15 second, Aperture Value- f/3.2
Exaggerated camera shake- Falling down
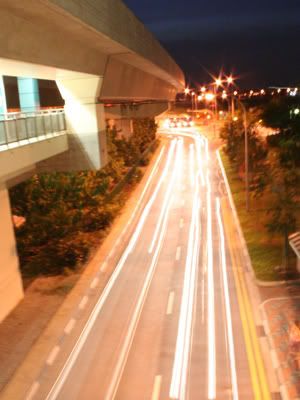
Figure 9: Shutter Speed- 4 seconds, Aperture Value- f/22
Motion blur- The headlights of moving vehicles create
bright streaks as they travel down the road.
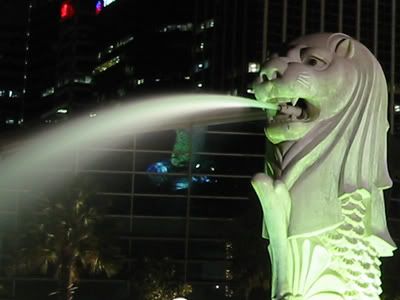
Figure 10: Shutter Speed- 3.2 seconds, Aperture Value- f/9
Motion blur: Long exposure times blur the movement of
water, creating a silky appearence.
Aperture Size (or f/stop)
If the size of the defect in the ship enlarges, the rate at which water enters the ship also goes up. The size of the aperture controls the rate at which light enters your camera. A larger aperture size means that light can get into your camera faster, and you can obtain a brighter image in a shorter period of time (i.e. a shorter exposure time or shutter speed). Thus, lenses with a wide aperture are sometimes termed “fast” lenses. Conversely, if you were to reduce aperture size, it would decrease the rate at which light gets through, and it would be necessary to use a prolonged exposure time to get a correctly exposed image.
Values pertaining to aperture size may be written as below:
f/1 f/1.4 f/2 f/2.8 f/4 f/5.6 f/8 f/11 f/16 f/22 f/32 etc
And it gets a little more confusing: a small f-number (e.g. f/2.8) denotes a larger aperture and a large f-number (e.g. f/14) stands for a smaller aperture size. As we go from left to right, the size of the aperture is halved and the shutter speed needs to be increased by 1 stop (or doubled) each time in order to maintain reciprocity, or correct exposure. In the same way, as we go down the scale from right to left, the shutter speed needs to be decreased by 1 stop (or halved).
For example, if you can get a correctly exposed picture at 1/500s @ f/4, then the same exposure can be achieved at 1/1000s @ f/2.8 or 1/250s @ f/5.6. Get the picture? No pun intended.
Aperture Size and Depth of Field
When a camera is properly focused on a point in the distance, this point (and all other points that are at the same distance from the camera) will appear sharp in the final image. All other objects in front or behind this plane are not strictly in focus but those nearer the plane of focus may still appear acceptably sharp to a viewer. The other details further from the plane of focus may appear blurred. These out-of-focus areas, if especially smooth and pleasing are often referred to as bokeh.

Figure 11: Shutter Speed- 1/6 second, Aperture Value- f/4
Many elements in the photo are blurred or out-of-focus
as a result of shallow depth of field.
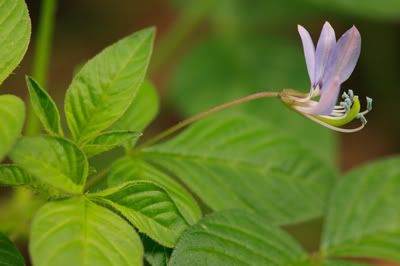
Figure 12: Shutter Speed- 1/2 second, Aperture Value- f/8
Notice here that a deeper depth of field has resulted in
increased definition in the petals of the flower and some of the
leaves, but at the expense of a more distracting background.
So before we digress too much, depth of field describes the amount of an image in front of and behind the plane of focus that appears acceptably sharp in a photograph. To be pedantic, depth of field is dependent on magnification and the aperture setting.
But to simplify, the depth of field in an image is the result of a relationship between a number of factors, some of which are:
-aperture size (a smaller aperture size will generally result in an image that is perceptively sharper in more areas than one obtained with a larger aperture size)
-focal length
-working distance (distance from the lens to the subject/ object)
-distance of the subject/ object from the background
In general:
-large aperture, long focal length and shorter working distance (hence increased magnification) --> small depth of field
-small aperture, short focal length and long working distance (hence reduced magnification)--> larger depth of field
The lenses on compact cameras are smaller and have shorter focal lengths than those on SLRs, so the effect of depth of field is not as pronounced. Compact cameras tend to produce images that are sharp throughout, whereas the images from SLRs may appear more 3-dimensional, with some areas in the photo obviously much sharper than others.
When photographing very small objects in macro photography or people for portraits, the primary emphasis is on the subject, so it is ideal to ensure that the subject is in focus but the rest of the details are thrown out of focus. A blurred background “simplifies” the scene and draws a viewer’s attention to the subject itself. This technique is also sometimes referred to as selective focusing.
In the following photograph, only part of the leaf, the eyes of the fly and part of its body are in focus while the background is completely out-of-focus. The use of a dedicated macro lens has allowed me to work very close to the fly, achieve high magnification and hence a shallow depth of field. As a result, all the foilage in the background has been blended into a crimson veil. This is an example of smooth bokeh.

Figure 13: Shutter Speed- 1/125 second, Aperture Value- f/5.6
A completely out-of-focus background has simplified this photo
immensely and the fly appears to pop right out of the picture.
In contrast, there is no specific subject in landscape photography, and the objective is to get many elements of the scene in focus for even impact throughout. Cityscape photographs generally fall into this category.
So does that mean we should always use the smallest possible aperture when taking landscape shots? No, not quite. For the purpose of this tutorial, it is sufficient enough to understand that the contrast, resolution and overall quality of a photograph actually drops when very small aperture sizes are used. This is a result of diffraction. Choosing an aperture value of f/5.6 to f/8 may strike a good balance for depth of field. Stopping down to such values will also often improve the output quality of a lens.
ISO (or ASA)
Traditionally, the ISO rating referred to the sensitivity of film to light. Such ratings are written as ISO 100, ISO 400, ISO 1600 and so on. More light-sensitive films have higher ISO (or ASA) ratings. Digital cameras do not utilize film, thus the ISO rating describes the sensitivity of the sensor to light, and the user can select the desired rating from a list of choices.
Selecting a higher ISO allows the sensor to pick up more light, resulting in a brighter image even if shutter speed and the aperture value remain the same. To put it another way, increasing the ISO allows a photographer to get a correctly exposed image with a shorter exposure time (thus minimizing camera shake and motion blur) and a smaller aperture size (allowing for greater depth of field).
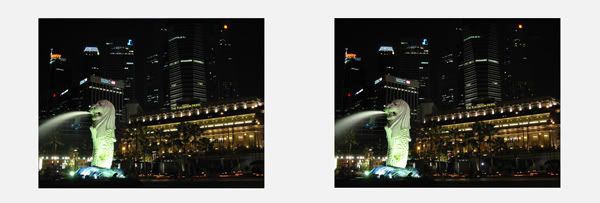
Figure 14: The photo on the left was taken using a shutter speed of 1.6 seconds and an aperture value of f/9, at ISO 100. The same scene was captured in the photo on the right with a shutter speed of 3.2 seconds, aperture value of f/9, at ISO 50.
But at higher ISO ratings, noise starts to destroy details, and in many compact cameras, the image cannot be salvaged beyond ISO 400. Digital SLRs have better noise-control capabilities and a number of models can keep noise levels acceptably low even up to ISO 1600. Noise makes a photograph appear grainy.
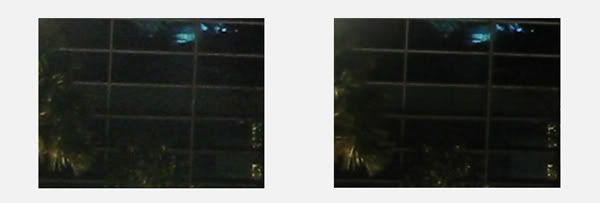
Figure 15: While the difference in Figure 14 is not obvious, a closer crop out of both images demonstrates that noise levels in the ISO 100 sample have indeed taken a bite out of some of the details, and it is much more grainy than the ISO 50 sample.
Shutter Speed, Aperture Size and ISO…Putting It All Together
If the above sections made you thoroughly confused and you need some simple guidelines for the production of good quality photographs, then this process might be helpful:
-Once you have found a vantage point that appeals to you, setup your tripod or use a sturdy object to support your camera.
-Tilt or elevate your camera as necessary to achieve a good composition. Pay attention to very strong spotlights or moving objects. Attempt to omit them from the frame or hide them behind stationary objects unless you are trying to achieve a specific effect.
-Turn off the flash. If used this might result in distracting reflections from nearby objects.
-Choose an aperture value between f/5.6 and f/8. Avoid closing down the aperture further than f/11 if possible.
-Choose the lowest ISO rating to obtain a cleaner image.
-Set shutter speed or exposure time as desired.
-If the image is still dark despite using the maximum exposure time, then choose a larger aperture size.
-But if the image remains underexposed despite using the longest exposure time and the widest possible aperture, then consider increasing the ISO. Adjust aperture values and shutter speed again as necessary.
Walkaround Night Photography
This form of low-light/ night photography goes against the grain of the guidelines above mainly because a tripod is never used, and it is often more fun and rewarding. There are times when it would be inconvenient, awkward or even risky to set up a tripod for long exposures, such as photographing on a busy street or in quiet alleys.
Without a tripod, it is necessary to use a higher ISO setting in order to achieve a shutter speed that is fast enough to minimize the possiblity of camera shake. Most cameras produce noise-laden images when the ISO is increased, but more advanced compacts and digital SLRs feature better noise control capabilities. If you can lay your hands on one of these, then this branch of photography is immediately within your reach.
The rule of thumb for handholding a camera is as follows:
shutter speed (seconds) = 1/focal length
At a focal length of 24mm, a shutter speed of 1/25s or faster is required to handhold a camera with minimal risk of camera shake. Intuitively, faster shutter speeds are needed at longer focal lengths. Be aware that 'focal length' in this formula refers to the focal length of your lens in its 35mm equivalent, not its base focal length. The rule also doesn’t apply to everyone as people with steadier hands will be able to produce shake-free images at longer exposure times, and this ability can also be trained. Experienced rifle firers will be familiar with the technique.
To improve stability, stand with your feet apart, with one foot in front of the other. Use both hands to support the camera and bring it close to your face (use the viewfinder instead of the screen to compose your image if you have to). Tuck your arms snugly against your body. Take a normal breath of fresh air and depress the shutter button halfway at the same time to lock focus. Breathe out naturally but hold half your breath. At this time, gently squeeze the shutter button down fully to capture the image. Then breathe out entirely. With a little practice, the quality of your handheld shots will increase dramatically and quickly.
Other positions such as a half-squat, prone or bracing on a stable structure may be equally helpful. Cameras that feature optical image stabilizing or vibration reduction technology are abundant, and these features will further improve the handholdability of the device.
It is advisable to use Program or Aperture Priority mode (do not use Auto) instead of the Manual Mode, which would leave most settings such as White Balance open for adjustment, but allow the camera to choose the appropriate shutter speed for minimal fuss and the fastest possible capture of images.
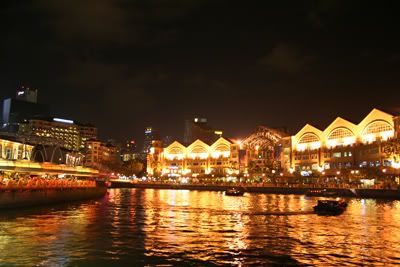
Figure 16: Shutter Speed- 1/6 second, Aperture Value- f/3.5
The enchanting lights of this riverside scene were captured
handheld at a setting of ISO 800.
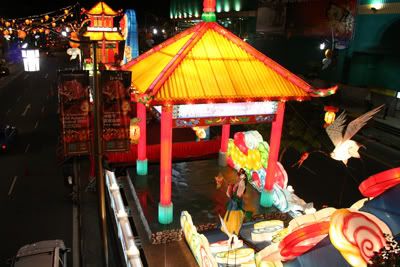
Figure 17: Shutter Speed- 1/80 second, Aperture Value- f/5.6
The beauty of the Mid Autumn Festival lightup in Chinatown,
Singapore was photographed while leaning over a bridge.
The Elements of an Image
Photography isn’t just a science. It is a form of art. It is important that all photographers develop an ability to speak to the audience through their work. There is a key element in every photograph, and some pieces might contain two or more such elements. Some of these are:
Light, Shadows, Shape & Form
Recall that photography is the act of painting with light. Without light, photos would never exist and photography becomes an art that is doomed to failure. It is paramount to understand both the quality and direction of light in order to use it effectively in your photography.
The Quality of Light
Light can be described in terms of its direction and quality. On a clear, cloudless day when the sun is high in the sky, light is abundant and plentiful, but it is also very harsh and unflattering. Human subjects squint. It creates dense shadows and very bright highlights in a scene that together result in very high contrast. A piece of film or a digital sensor has limited ability to record detail in both the brightest and darkest areas of a scene. It cannot record things exactly as our eyes perceive them and shadows may record completely black, while highlights become a featureless white.

Figure 18: Shutter Speed-1/500 second, Aperture Value- f/8
Harsh lighting creates a very high level of contrast in this
outdoor still-life study.
Most people consider such light to be uncondusive for photography and pack the camera away till later in the day. But there are still good photos to be made under such conditions. In urban areas and in some landscapes, light will only penetrate into the alleys closer to noon, revealing the many details within. Harsh light may be used to add mood to a photograph of an unforgiving landscape, or to set off details of man-made structures.
Alternatively, search for subjects that are situated in shaded areas of the landscape but are well-lit by the light reflecting from surfaces around them.

Figure 19: Shutter Speed- 1/40 second, Aperture Value- f/4
Window lighting has a noticeable directional quality, but unlike
direct light it is slightly diffused and less harsh. It is an attractive
form of lighting for portraiture. I noticed the light pouring in
through the window and simply motioned this couple to pose just
next to it. The light has created a situation with a good amount of
contrast, setting off facial features while allowing detail to be
maintained in both the shadows and highlights.
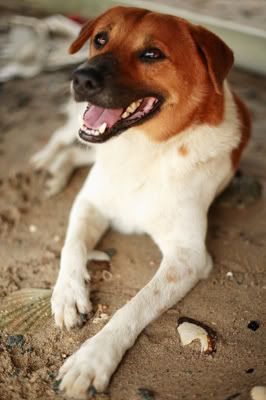
Figure 20: Shutter Speed- 1/400 second, Aperture Value- f/2
This dog was found hiding under a pier at low tide, away from
the late morning sun. Just outside the shade of the pier the sandy
shore acted as a giant reflector, throwing light back onto the dog.
The light created attractive highlights in its eyes and emphasized
the texture of its fur. A large aperture was intentionally used to
throw the unsightly background out-of-focus.
On the other hand, lighting is more diffused on an overcast day. Contrast is reduced but color saturation peaks. Such conditions are preferred for macro, closeup and portrait photography. When photographing under cloudy skies or in deep shade the camera may record colors as being cooler (more blue) than the human eye perceives. Experiment with other white balance settings such as 'Cloudy' and 'Shade' which will help to warm up a photo.

Figure 21: Shutter Speed- 1/2500 second, Aperture Value- f/2
Soft, diffused light allows the colors of these seashells to really
shine through. I intentionally used a large aperture to also
throw some of the details out of focus.
Good quality lighting occurs during the short time of sunrise and sunset. At these times the sun is low in the sky and it bathes the landscape in a rich golden glow. Such colors bring about feelings of warmth and nostalgia from viewers, and thoughts of family and friends. These periods of great light are also known as the Golden Hours.
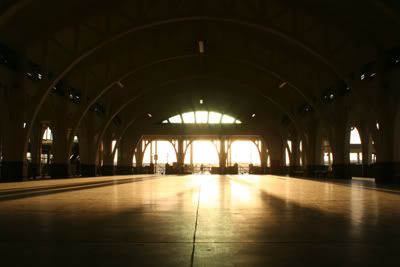
Figure 22: Shutter Speed- 1/13 second, Aperture Value- f/22
The low light of the early morning sun shines through the arches,
creating long shadows that snake along the floor of this old pier.
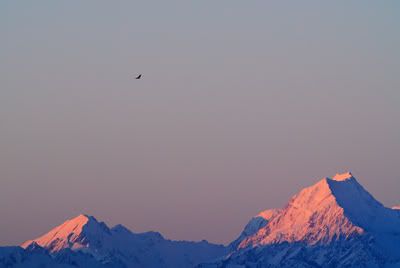
Figure 23: Shutter Speed- 1/125 second, Aperture Value- f/5.6
The setting sun casts its warm glow on the mountains, turning
the white snowy faces into a shade of crimson-red. Those areas
of the mountain that are in the shadow appear a deep-blue color.
Speaking of which, night photography is best performed during the time when there is still some light and color in the sky. This may be at dawn or at dusk where the sky appears a deep blue or even magenta. While night photography may still be carried out once the sky has become pitch-black, it introduces once again the problem of high contrast. Even when a cityscape is itself well-exposed, the sky will still be very dark and the edges of some buildings may even appear to merge with the black background.
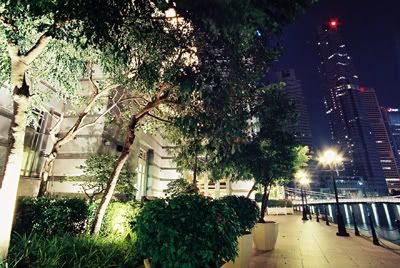
Figure 24: Shutter Speed- 32 seconds, Aperture Value- f/16
The blue sky and the lights of the cityscape in the background
provide a soothing backdrop to this riverside scene behind a hotel.

Figure 25: Shutter Speed- 2 seconds, Aperture Value- f/8
Pay special attention to how the yellow lighting of the building
contrasts in an almost radiant fashion against the deep blue of the evening sky.
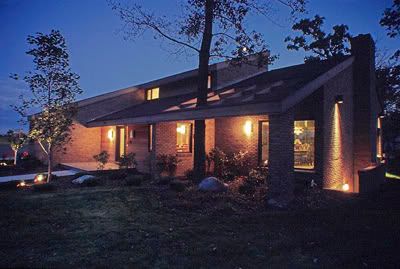
Figure 26: Exposure factors unknown.
A contribution by an anonymous member of the POTN Forum.
Note that the rooftops of the building and the detail in the trees
would be much less pronounced against a pitch-dark sky.
When a large amount of pure black sky is included in a night photo, it becomes dead space that is devoid of color and detail. The effect of this may be sufficient to cause a viewer to lose interest. If it is necessary to continue photographing way after dusk, a photographer can still successfully pursue night photography by simply choosing to do more closeup or abstract studies, or photograph scenes in a way that minimizes the presence of the sky.
The Direction of Light
A subject may be frontlit, sidelit or backlit. Frontlighting occurs when the light is directly behind the photographer. Such subjects are the easiest to meter and the camera will usually produce correctly exposed pictures under these circumstances. But frontlighting causes human subjects to squint, and a photo is also at a risk of appearing flat, devoid of texture and form.
Sidelighting on the other hand brings textures into high relief, adding a tactile component to a photograph and giving form to subjects. Fortunately enough for photographers, such lighting in nature occurs early or late in the day, coinciding with the Golden Hours as described above.
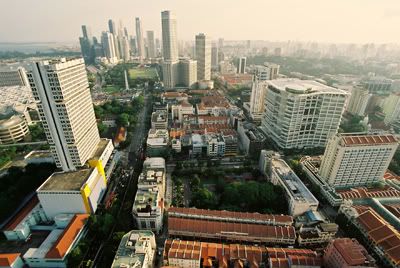
Figure 27: Shutter Speed- 1/60s, Aperture Value- f/16
Sidelighting brings out textures and gives form to the
buildings in this scene. It also throws deep shadows in
other areas of the photo.
Note that the exposure factors above were used in error. When doing aerial photography and you are a considerable distance above the ground, it is not necessary to use a small aperture for large depth of field. This is because all the objects in your scene are effectively at infinity. In fact, a larger aperture should be used to allow for faster shutter speeds that will reduce the chances of camera shake from the craft you are seated in.
A subject becomes backlit when the light is behind an object and the photographer is shooting into the sun. Because the camera meter is fooled into underexposure by the brightness of the sun, a solid object may be reduced to an opaque shape known as a silhouette. If the shape is easily recognizable, a silhouette adds interest to a photograph and draws attention.
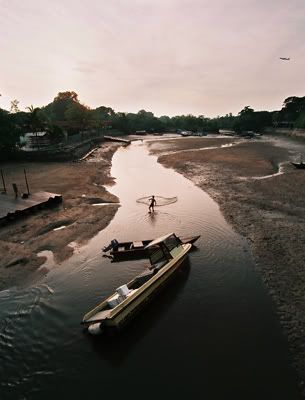
Figure 28: Shutter Speed- 1/80 second, Aperture Value- f/6.3
The rising sun has backlit the fisherman casting his net while
creating an almost sidelit effect on the speed boats behind him.
While the fisherman is very small in the frame, he draws
attention very quickly because the shape of the human figure
is easily recognizable.
The effect of backlighting on translucent objects is equally interesting because the subject may appear to glow with a halo of light while demonstrating its fine details and structure.
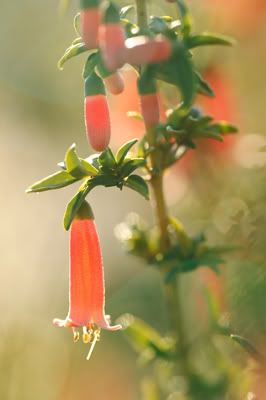
Figure 29: Shutter Speed- 1/125 second, Aperture Value- f/3.5
The delicate details of these Australian Fuchsia flowers seem to glow
as a result of backlighting.
Shooting into the sun introduces the risk of lens flare which reduces contrast and color saturation and may be visible as a row of starbursts across the photo. It can be used deliberately to add to ambience and atmosphere. To reduce the chance of lens flare use a lens hood, shade the lens partially with a hand or a piece of card, or obscure it behind a solid object.

Figure 30: Exposure factors unknown.
Photo contributed by Glenn Chua.
Lens flare has added much energy to this still-life study.
Line & Pattern
What makes a line so important? Without line there can be no shape, and without it there can be no form. Besides being a fundamental component of a photograph, lines can be used as a driving force or to spark emotion in a static photograph. Lines may be physically identifiable or implied by pattern.
The Nature of a Line
Horizontal lines are found in many landscape scenes in the form of a horizon. They impart a sense of serenity, peace and stability to a photograph. On the other hand, vertical lines speak of strength and power. Diagonal lines are dynamic, creating feelings of movement and tension. Gently curving lines such as that of a meandering river also bring about feelings of movement, but in a slower and more dreamy fashion.
The Power of a Line

Figure 31: Shutter Speed- 1/100 second, Aperture Value- f/4.4
The pattern created by these two stacks of colorful plastic chairs acts
as a powerful force that drives the eye down the photo and this is
further strengthened by the links of the chain. The padlock is an
interesting addition because it creates a focus point for the eye to
rest on, and also prevents the photo from becoming too monotonous.
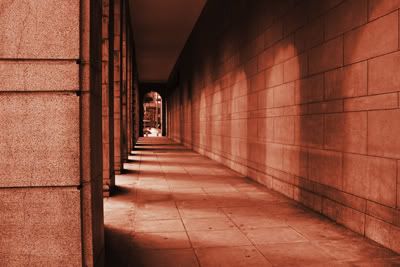
Figure 32: Shutter Speed- 1/30 second, Aperture Value- f/8
Light patterns on the floor and the wall, plus the lines of the pillars
lead the eye right through this concrete structure.
Color, Tones & Hues
The presence of color or the complete lack of it adds body and flavor to a photo. Depending on its intensity, it can give pictures a lively or sombre mood. Dashes of bright color add an element of surprise; stark contrasts in color and tone may make an arresting photo all on its own.

Figure 33: Shutter Speed- 1/640 second, Aperture Value- f/8
This is a photo that's all about color! The red and green of the Ixora plant
create as stark a contrast as the black and white of the butterfly's wings.
Soft hues, pastel colors and some monochromatic images on the other hand are much more soothing and less suggestive, and their effect lingers like a sweet aftertaste.
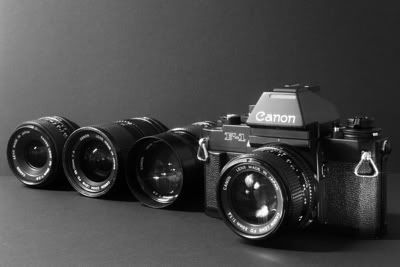
Figure 34: Shutter Speed- 25 seconds, Aperture Value- f/22
I decided to make a monochrome image out of this setup in order to place
more emphasis on contrast, tones and the physical characteristics
of the camera and the lenses.
A Deeper Meaning
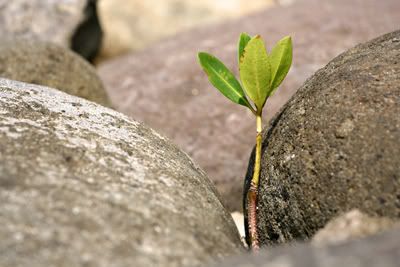
Figure 35: Shutter Speed- 1/2000 second, Aperture Value- f/4
A salt-encrusted seedling growing in a tight space between two boulders
emphasizes the harshness of the environment, and tells a tale of hardship
yet perseverance and faith.
That Fuzzy Feeling

Figure 36: Shutter Speed- 1/60 second, Aperture Value- f/8
Babies and many domestic animals are simply adorable and their
appearence makes people fall in love with them. Cute subjects are
highly photogenic and usually make desireable photos.
Story-telling
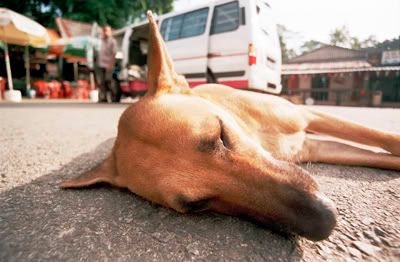
Figure 37: Exposure factors unknown.
In reality, this is simply a photo of a dog sunbathing
on the street. But the low viewpoint, the closed eyes of the dog,
plus the man and the van in the background is sometimes
enough to suggest that the dog was indeed injured in an accident.
This photo was taken with an ultra wide-angle lens. Notice how
the nose and the forehead of the dog are disproportionately larger
than even its front legs. Take note also of how the very low
viewpoint creates intimacy and makes you feel involved in the scene.
The Basics of Composition
While a painter starts with a blank canvas and then adds to it various elements as he/ she sees fit, the photographer has to contend with elements that are already present in a scene. It is then his/ her job to either form a pleasing arrangement with these elements, change viewpoints or abstract certain elements from the scene using the camera's viewfinder before capturing it on film. The art of composition is the art of photography.
The Rule of Thirds
One of the guiding lights in photography is known as The Rule of Thirds. To visualize this, pick up any photograph and divide it into 9 imaginary squares.
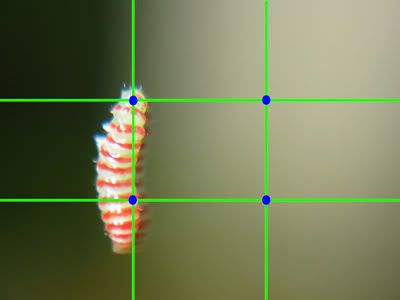
Figure 38: A photo illustration of the Rule of Thirds.
The four points at which the lines intersect are indicated by the blue dots. These are focal points, the areas of the image to which the eye is naturally attracted to. When an object is placed at these focal points, or even along those green lines, it is given an added emphasis. In general, it is best to avoid placing an object dead-center within the frame. But Macro shots may be one exception.
The green lines themselves are a good guide on where to place the horizon lines when photographing vast expanses of space, or a beautiful sunset. Put the horizon line towards the bottom third of a photograph to show more details in the sky, or shift the horizon to the top third to give off a feeling of great distance.
In the end, the Rule of Thirds is really only a guide and it does not necessarily apply to every photograph. It’s not uncommon to find award-winning photographs that have gone entirely against the grain of this guide.
Simplify, Simplify, Simplify!
'Less is more', as quoted from Men and Women, a poem by Robert Browning. Many new photographers have the habit of trying to 'take it all in' when photographing a given scene. The result is a jumble and confusion of elements with no clear subject or message. In some cases a key subject may indeed be recognizable but its significance is diminished and diluted by all the unwanted information in the rest of the photograph.

Figure 39: Shutter Speed- 25 seconds, Aperture Value- f/5.6
This photo is so simplified that it is bordering on Minimalism.
The luminous hands and indicators of the watch face stand
out so clearly in this image mainly because the background
is exceedingly simple and clean.
When presented with a range of interesting things in a single field of view, decide first on what should be your main subject and then eliminate any other objects which conflict with or compete with your subject for attention. When the photograph is finally presented to an audience, it should leave no doubt in their minds about what your key subject or message was. In the end, it is not what you include that makes a photograph, but rather, that which you choose to omit.

Figure 40: Shutter Speed- 1/125 second, Aperture Value- f/5.6
This photo was taken at the jaguar enclosure at the Singapore Zoo,
from behind a thick glass panel. There were plenty of other distracting
elements around: people, other jaguars, steel bars, wire and the
wooden decorations in the enclosure itself. I used a very long
focal length lens to eliminate all the clutter, concentrating on just one jaguar.
The final picture draws attention immediately to the big cat's endearing
expression and its clasped paws.
Balance

Figure 41: Shutter Speed- 1/125 second, Aperture Value- f/4
The dog, the door to the house and the stool with a pair of sandals
on top are all important elements of this scene. Use your hand to
cover any one of these elements at one time and the rest of the
image immediately loses its impact and significance. While the dog
may be the main subject, the other elements in the photo play an
important role in adding interest to the scene while being
subordinate to the key subject.

Figure 42: Shutter Speed- 1/160 second, Aperture Value- f/8
As with the previous example, use your hand to cover out just
one of the baskets of flowers and its clear that the photo would now
become either top or bottom heavy. The loss of balance also introduces
a feeling of tension, which is not what I wanted to portray in this
still-life image in a quiet, peaceful town. The grooves in the wall are also
surprisingly important in this composition, giving it an architectural
flavor and guiding the eye from left to right. Note also that each of the
baskets of flowers are arranged in this composition according to the Rule of Thirds.
Watch That Background!
While you are working at your subject, don't get so carried away that you fail to notice the background. A messy background is distracting and detracts from the subject. Nearly everyone remembers the group photographs where trees and telegraph poles seem to grow out of some people's heads, so don't let this happen in your photos! Selective focusing, shallow depth of field and the use of a longer lens are some methods you can employ to simplify or control the appearence of the background.

Figure 43: Shutter Speed- 1/320 second, Aperture- f/8
This is an example where the background obviously adds
interest to the foreground subject. Take away the background
cat and its inquisitive gaze and the photo has lost its impact.
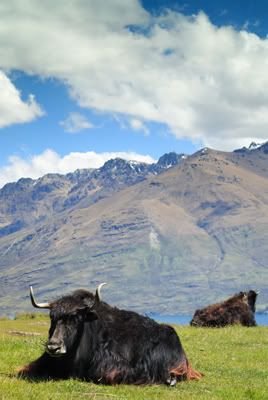
Figure 44: Shutter Speed- 1/125 second, Aperture Value- f/8
The photo of the Tibetan Yaks above is seemingly arranged in
layers. Care was taken to ensure that both the Yak's profiles did
not merge into each other, and that the background water body
and the mountains were clearly separated from the grassy hill in
the foreground.
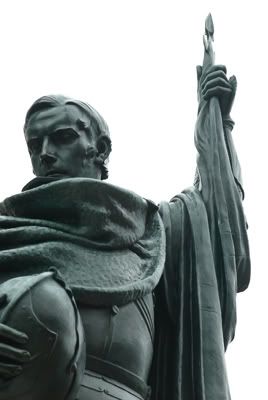
Figure 45: Shutter Speed- 1/100 second, Aperture Value- f/8
Photographing this war memorial was a challenge. I'm sure many
who passed this way already made an attempt at it. I decided to
shoot just a striking portion of the memorial instead. Taking a low
viewpoint I succeeded in positioning this cameo against the sky,
cutting away the clutter of the city. In order to compensate for this
backlit situation, positive exposure compensation was done. This allowed
me to capture detail in the war memorial while burning the sky completely
white. It is an example of how a photo can succeed even without a background.
Using Your Glass & Your Legs Effectively
Present 10 different photographers with the same landscape and you'll probably land up with 10 very different photos. In the same way, you can produce many striking images within the same compound simply by choosing a different focal length, a different lens, changing your viewpoint or even by deciding to shoot in a vertical instead of a horizontal format.

Figure 46: Shutter Speed- 1/60 second, Aperture Value- f/8
The scenery from the backyard of this motel was simply gorgeous.
I took a wide angle photo first at a focal length of around
36mm (35mm equivalent) to depict the scene in its entirety.
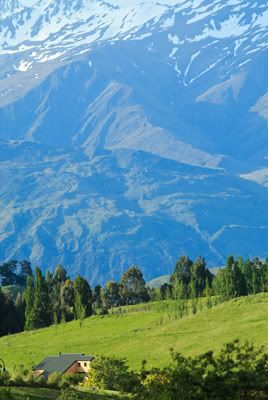
Figure 47: Shutter Speed- 1/320 second, Aperture Value- f/8
Next, I clambered on top of one of the picnic benches to gain a
higher viewpoint. I mounted a telephoto lens on my camera and
started to scan the faraway scenery through the camera's viewfinder.
This charming house was seated amongst the mountains and the hills,
and I photographed it at a focal length of 390mm (35mm equivalent).
Note how the telephoto lens has appeared to compress the elements
in the scene, making it appear as though the house, the hills and the
mountains are stacked just next to each other.
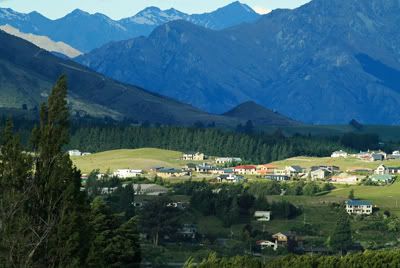
Figure 48: Shutter Speed- 1/500 second, Aperture Value- f/8
From the same viewpoint and using the same lens as in the photo
above, I simply swiveled to the right and photographed another
snippet of the vast scenery before me.
Conclusion
With that, I’ll bring this tutorial to a close. It is hoped that this document has shed some light on the concepts of photography and more importantly, filled you with a burning desire to take that camera onto the streets for a special night photography trip.
If you have any doubts, corrections, questions or comments, please drop me one in the comment section or write me an email. Please feel free to link to this tutorial and bookmark it for future reference.
Run along, and get trigger happy! Experiment and have fun!

5 comments:
Hey,
Great article for beginners. I recently got into photography so I'm trying to soak up as much as I can. Anyways, thanks for spending, so much time, I'm assuming on this article.
_Dc
Thanks, glad you found it helpful. It took a long time to write out the initial article and editing has always been quite a big job. I've always sought to make the newest edition much better than the last.
Thanks a lot for a wonderful explanation mate! I am really understanding a lot of digital photography
Looking at the settings for night shots, I was hoping the ISO was also listed.
The note was helpful about not always using the smallest aperture to take advantage of the lens potential.
Night imaging is always a true challenge.
Thankyou.
Philscbx
Thank you for the tutorial.
I hope you come back and share more.
Take care,
Mike
Post a Comment